Wednesday, February 15, 2012
Overview
Categories of Aging Reports
- Aging – By Account
- Aging – By Amount
- Aging – By Collector
- Aging – By Salesperson
Report Parameters for Aging Reports
Wednesday, February 15, 2012 by Team search · 2
Friday, February 10, 2012
Friday, February 10, 2012 by Team search · 0
Friends, this post will quickly take a quick look on using the data loader software…
In General, there is no extensive setup required to run a load. The user must have an Oracle login and password and be logged in to the system. Lets walk through the steps necessary to create a simple load.
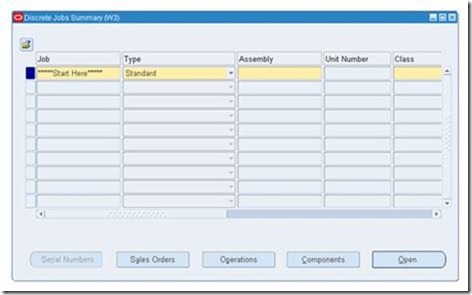
This is the DataLoad window. The spreadsheet section of the page is very similar to the spreadsheets in Microsoft Excel. Importing data from an Excel spreadsheet into the DataLoad spreadsheet is very easy.
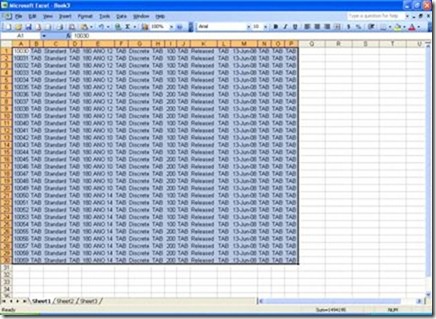
First open the Excel file that should be copied.
For successful import, this file should have no titles or added fields in the spreadsheet. The spreadsheet above was created to import thirty discrete jobs into Oracle. It contains the job number, the type of job being created, the assembly name, the manufacturing class, quantity, job status, and the start date. It was ordered in this way based on the order in which this data is required when a job is created in Oracle.
The best way to determine exactly what is necessary for data input in Oracle is to open the window into which data will be entered and create a dummy input, recording every command used along the way. These will most likely include use of the TAB key and possibly the Enter key. Any commands that must be used should be recorded in an excel file. For a list of the available commands for use in DataLoad, a list can be found under the Edit menu, under “Commands” or by clicking the “Edit Commands” button in the toolbar.
For this example, the first line in the Book 3 Excel spreadsheet will be used, but will be re-formatted for use with DataLoad.
This first line is how the data were organized in the original file, while the second line has the same data, but it reformatted for DataLoad. The multiple “TAB” commands at the end of the second line will finish a record in Oracle and tab down into the second record for input of another discrete job. The inputs in the file mimic exactly what is necessary from a user when inputting a discrete job. After identifying how the file should be formatted, the rest of the original Excel spreadsheet should be reformatted as well.
A save command could be added to the end of the file, but I would suggest not using that command. If Oracle were to run slow during input, Dataload would continue trying to load information even if Oracle is not responding. This could cause data discrepancies if input errors occur. Visual review of new records in Oracle should be used before saving new inputs.
When the Excel spreadsheet has been formatted correctly, highlight the desired cells to be copied in the Excel spreadsheet. When importing into a DataLoad spreadsheet, DataLoad will automatically recognize the active Excel spreadsheet without being directed towards it.
Now go back into the DataLoad window. Click the “Import data from Excel” button in the toolbar to automatically copy all the cells selected in the excel spreadsheet. This button is on the far left in the picture below. Import can also be done by clicking “Excel Import” under the Tools menu.
The information from Excel is now in DataLoad and read to be copied into Oracle. First, be sure that the Oracle instance is open to the window in which the input will be completed, with the cursor in the field requiring the first input.
Back in DataLoad, there are two necessary fields to be filled before the load can begin, as well as one optional field. These are the Window, Command Group, and Description fields.
Under “Window”, DataLoad will automatically recognize every window open on the PC. Choose the Oracle instance running the input window. For the “Command Group”, choose 11i. This is an older version of the Oracle E-Business Suite that uses the same commands at R12. A description can be entered in the “Description” field, but is not necessary.
Before beginning the load, ensure that the data is correct. This load can be saved for use later. Also, ensure that the open instance of Oracle is still valid and doesn’t require re-login.
When the load is ready to begin, click on either the “Send data to form” button in the toolbar, or the “Send Data” option under the Tools option in the toolbar.
Data insertion will automatically begin. The user may be required to stand by and ensure that data is being entered correctly. When the load has completed, the user can look over the inserted data to ensure its accuracy. If there was an error during input, it may have occurred due to lag in Oracle during insertion. To change this, first close out of the Oracle form without saving the erroneous data and reopen the input form to be ready for the next try.
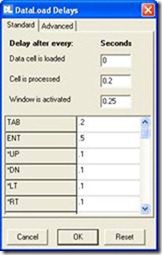
In DataLoad, the user can specify a delay time after data insertion to account for any lag in processing. To change the delay time, either click on the hourglass button in the toolbar or click the “Delays” option under Tools. This will open the DataLoad Delays window.
Upon changing the delay options, the load can be initiated once again. Continue to change this delay options as often as necessary to ensure an accurate load.
I hope it helped you understand the basics of Data Loader..
by Team search · 2
Friday, February 3, 2012
1. Overview
While developing a BPEL project we would be faced with so many situations here we need to interact with Database, use FTP, or to read or write a file to local system. For such sort of situations the JDeveloper as provided us with good number of Adapters, through these Adapters we can easily interact with external environment.
Almost all the adapters generate a XML schema once we create them. As XML is understood by all environments, interaction between different environments is simplified.
In JDeveloper we have some eleven adapters like Database Adapter, FTP Adapter, File Adapter, Oracle Application Adapter, JMS Adapter and many more.
This document deals with Database Adapter only.
What is Database Adapter?
Database Adapter is a tool provided by JDeveloper to interact with standard Database. This Adapter is having four different modes of interacting. Based on our requirement we can select a mode and use it to meet our requirement.
Types of Database Adapter
JDeveloper provides four types of operations that can be done using the database Adapter. Those are:
- Call a Stored Procedure or Function.
- Perform an Operation on table. (Which includes operations like insert, delete, select.)
- Poll for New or Changed Records in table.
- Execute Custom SQL
Below links will help you to understand the above mentioned four different operations of a Database Adapter….
1. How to create a BPEL Project and a database adapter?
http://www.shareoracleapps.com/2012/02/create-project-and-database-adapter-in.html
2. How to configure a Database Adapter to Call a Stored Procedure or Function?
http://www.shareoracleapps.com/2012/02/bpel-calling-stored-procedure-using.html
3. How to configure a Database Adapter to poll for New or Changed records in table?
http://www.shareoracleapps.com/2012/02/bpel-creating-database-adapter-for.html
4. How to configure a Database Adapter to Perform an Operation on table. (Which includes operations like insert, delete, select.)
http://www.shareoracleapps.com/2012/02/database-adapter-to-performs-simple.html
5. How to configure a Database Adapter to Execute Custom SQL
http://www.shareoracleapps.com/2012/02/database-adapter-to-handle-custom-sql.html
Friday, February 3, 2012 by Team search · 0
1. For executing a custom SQL Statement, select the fourth option in the below screen and click ‘Next’.
2. In next step you have to specify the custom SQL statement to be used, for this automatically a XML Schema Definition is generated. Click ‘Finish’ button, this completes the creation of database adapter.
3. Once you have created any Database Adapter and clicked ‘Finish’ button, we will get the below screen. It populates data for WSDL File location, Partner Link Type, and Partner Role.
I hope it helped you guys… Enjoy Sharing…
by Team search · 0
You might be having a requirement wherein we need to update a table or perform some action if ever there is some change in some specific table. For achieving these sort of requirements BPEL provides us with Database Adapter with a polling option.
1. Once you have dragged the database adapter in to the work area and giving the name of the adapter and connection name, you can find the below screen where you have to select ‘Poll for Changed records in Table’.
2. Once you click ‘Next’ you are asked to import the tables to be used. Once you have selected the tables to be imported, click OK.
3. In this step we have to specify the root table from the list of tables that we selected.
4. If ever you want to have some relations between the tables then you can create them in next step. Once you click on Create button then the following screen appears where you have to give the details of the relation you want to create like the parent table name, Child table name, and type of relation and so on. Once this is done press OK.
5. In the next step you can select the columns that you want to exclude in Queries. Click next.
6. Now in current step you have got a screen where in you have to select the operation to be done after table has been polled. The appropriate where condition is generated based on your selection in the following screen.
a. Delete the Row(s) that were Read: By using this, the rows are completely deleted. This scenario is most useful if ever the size of table is very large and you cannot afford to increase the number of rows in it. By doing this the efficiency of the table is increased. You can use this if ever the data being stored is not so important.
Once you have selected this option the next screen asks you the frequency of Polling, and other criteria. Now click ‘Next’.
According to the data given the final SQL statement is generated. You have an option to edit the SQL statement generated also.
b. Update a field in Table (Logical Delete): This is most widely used scenario. You can opt for this if ever you don’t want to check for changes in the same old rows but also cannot afford deleting these rows. Here we have a field in which we try to toggle the values from some constant to other constant. You will poll only on the rows which have some constant and once it is checked we will toggle that value.
c. Update a Sequencing Table: This is used to update a sequencing table based. Sequencing table feature can be used when there is a field whose value will keep on increasing E.g. Primary Key, creation date or last update date. New table will be created where last read value of the field is stored. Adapter checks for the changes based on the value in the custom table.
d. Updating different sequencing table in Another Database: This is used to update a different sequence table in another database. For this you need to give the database name required. This feature can be used when user doesn’t have access to create a new table in the host database.
e. Update Sequence File: This option works similar to above cases but uses a file on the server machine.
by Team search · 0
In this post, let us see how to access a database to execute a simple query like insert, update, select, or delete; BPEL provides a direct method through which we can directly interact with database without any Queries. We just need to specify the table name and the operation to be performed.
Once you have selected the Database connection or created a new database connection the next step is selection of type in which we can interact with Database. In that list we have to select the second option of performing an operation on database.
In this type, we have multiple combinations of simple Operations from which we can check the required operations and use them directly without any Queries. The screen looks as given below.
1. Once we select the required operations and click next, we will have a screen asking us to import the tables from database which we want to access. You get a dialogue box asking for a filter for name based on which the tables would be displayed in the left panel. User has to select the required tables and click on arrow mark then the tables would be displayed on right side. Now once user clicks OK the tables in the right panel are imported.
2. If you selected multiple tables then JDeveloper asks for the master table in next step. Once you have selected the master table in next step you have to give the primary key on that master table.
3. If you want to have some relations between the tables then you can create them in this step. Once you click on Create button then the following screen appears where you have to give the details of the relation that you want to create like the parent table name, Child table name, and type of relation and so on. Once this is done press OK.
4. In next step, you can select the columns that you want to exclude in Queries. Once you click finish, the creation of Database adapter for a simple operation on table is completed.
by Team search · 0
Let us first understand how to create a simple Project. Then we will see how to create an adapter.
Creating a Project
- Right click on the "Applications” and select “New Project” as shown in below Screen shot.
- In “New Project“ dialogue box select “BPEL Process Project” and click OK.
Note: We have three types of Projects, they are
a) Synchronous Process
b) Asynchronous Process
c) Empty Process
In our case we will be using empty Process.
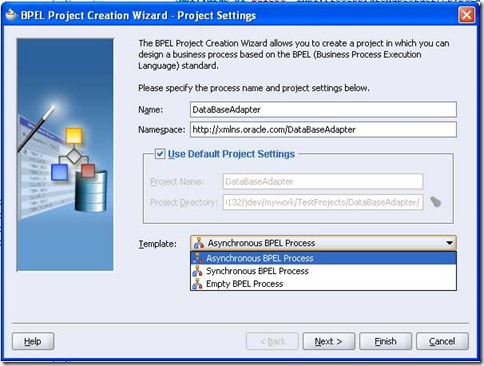
- Give a name for your Project and select “Asynchronous BPEL Process” for Template as shown in the screen shot, and click Finish.
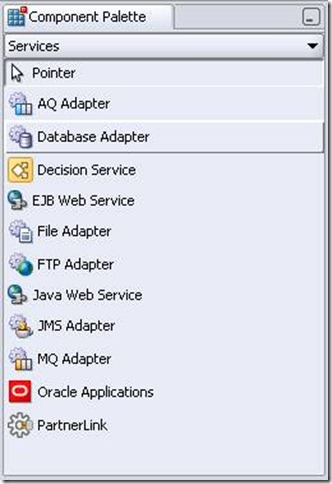
- Now on right side of JDeveloper we have a Component Palette. In this Palette select “Services”. By this a list of services are displayed from which select “Database Adapter” and drag it into the workspace as shown in the screen shot. Now Database Adapter Wizard starts.
Note: If ever it is not present then go to the “View” option in menu bar and select Component
Palette.
- Once you click on next button in the wizard, you are asked to give the name for the Database Adapter. In this case give “DatabaseAdapter” and click ‘Next’.
- In this step, you have to select the database that you want to interact. If ever you are interacting with a new database then click on “New” button by which Database Connection Wizard starts.
Creating a Database Connection
Database Adapter Wizard is a tool provided by the JDeveloper where in we can easily create a database adapter by providing minimum number of details like connection of database to be used, and table names.
For using this wizard you are required to create a database connection by providing the appropriate credentials. We have two methods of doing this. First one is creating the connection before hand by going into “Connections Navigator” and creating a new database connection by right clicking on Database option.
The second method is while creating a database adapter. This is explained below. You can follow the same steps while creating a connection using method one also.
- Once the Database connection wizard starts click on next button.
- In step 1, you have to give a name for the connection and “connection Type”. Mostly the connection type is defaulted to Oracle (JDBC).
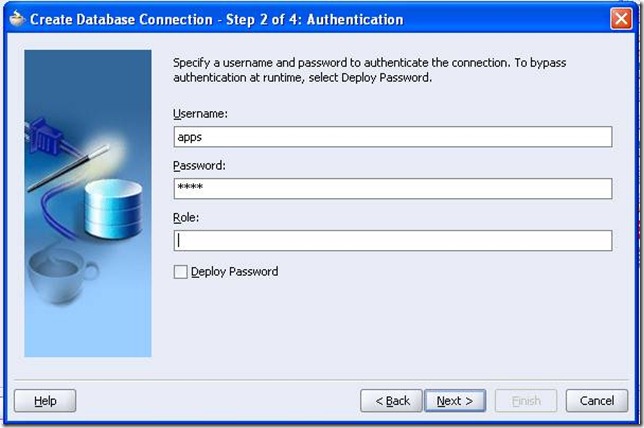
- In step 2, give the user name and password through which you interact with the Database. “Role” field is optional so you may leave it. After you give these details press Next.
- Now, in step 3, we have to specify various details for the Database connection to establish as shown in the screen shot.
Note: The screen shot below shows the connection details for apps database.
- Then Test connection as shown in the wizard and once the Success message is displayed click “Finish”. This completes the creation of Database Connection.
- Once you have created the database connection, select its name from the drop down list. All other fields of the form are displayed automatically. Check if the JNDI name is populated.
by Team search · 0


